
Where to find the Add-ons/Account Charges screen #
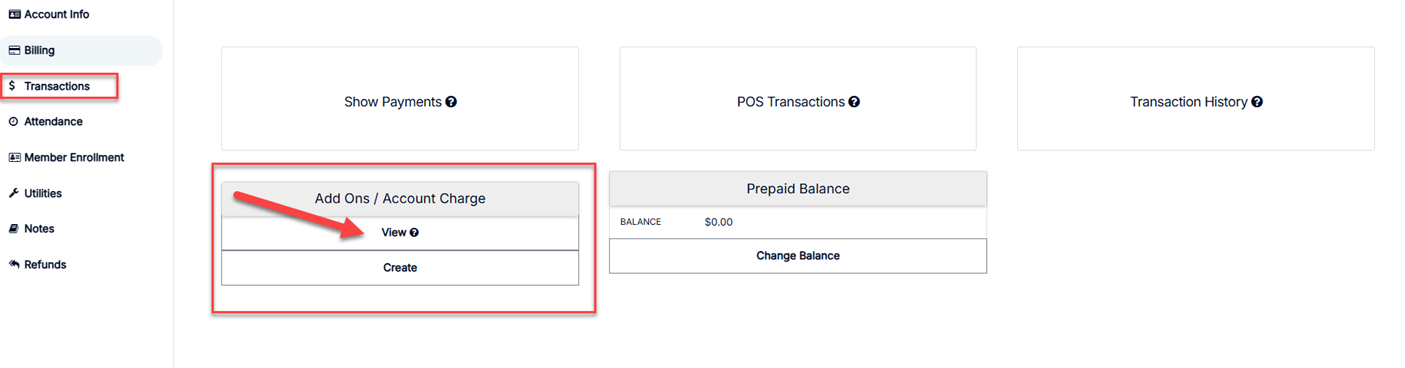
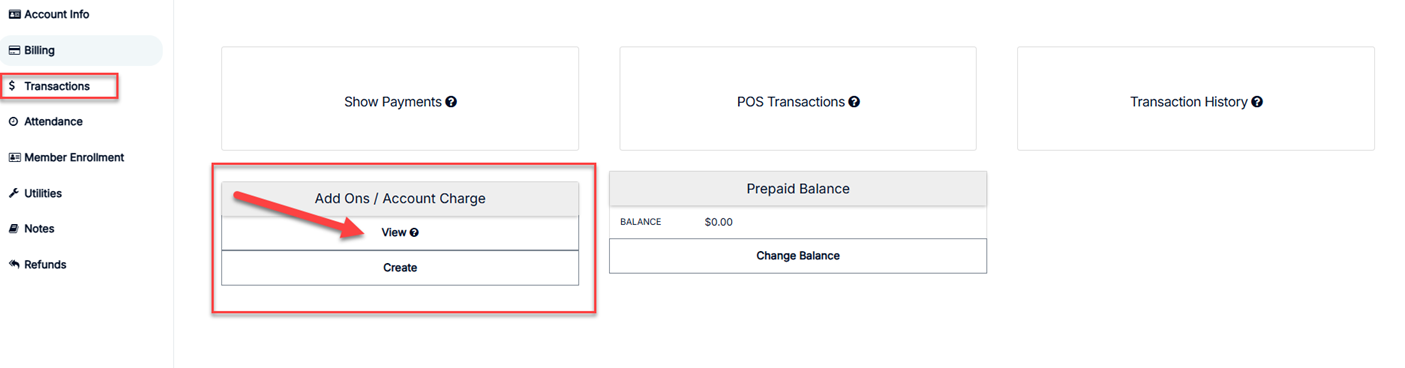
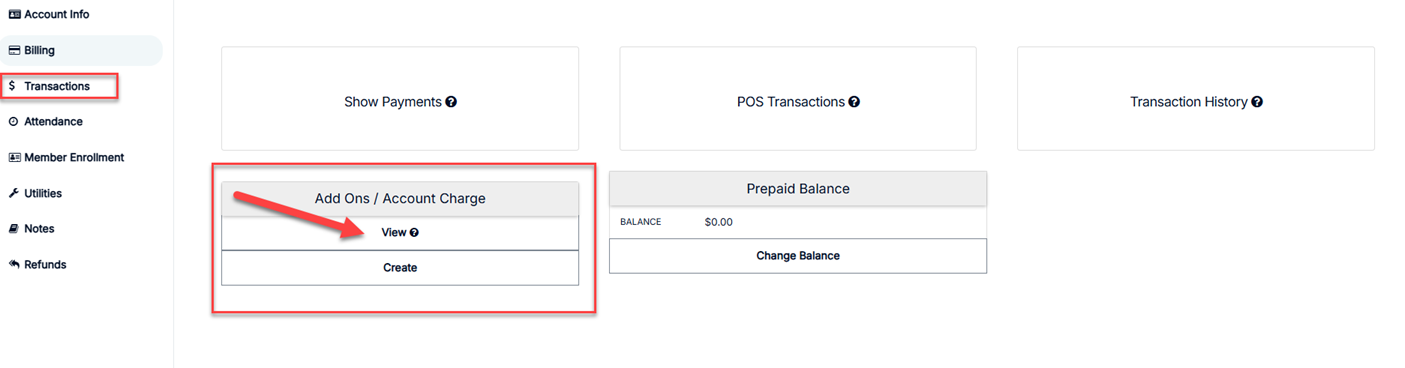
The Add-ons/Account Charges screen is found in the Transactions section of member accounts.
View add-ons #
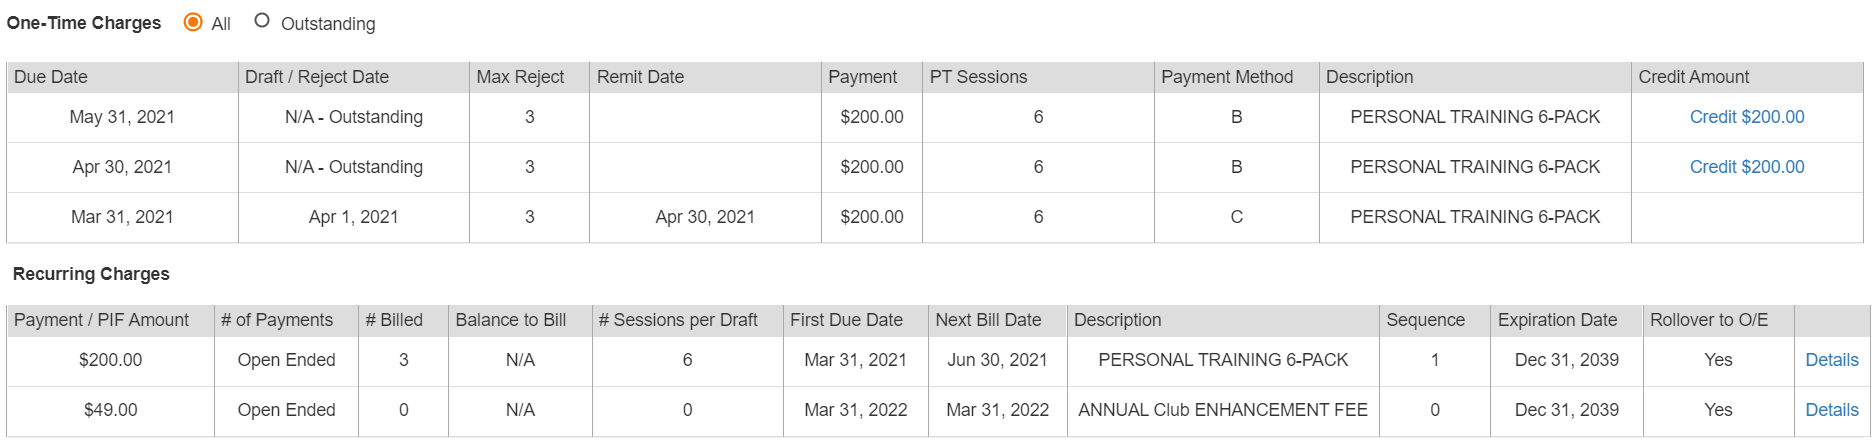
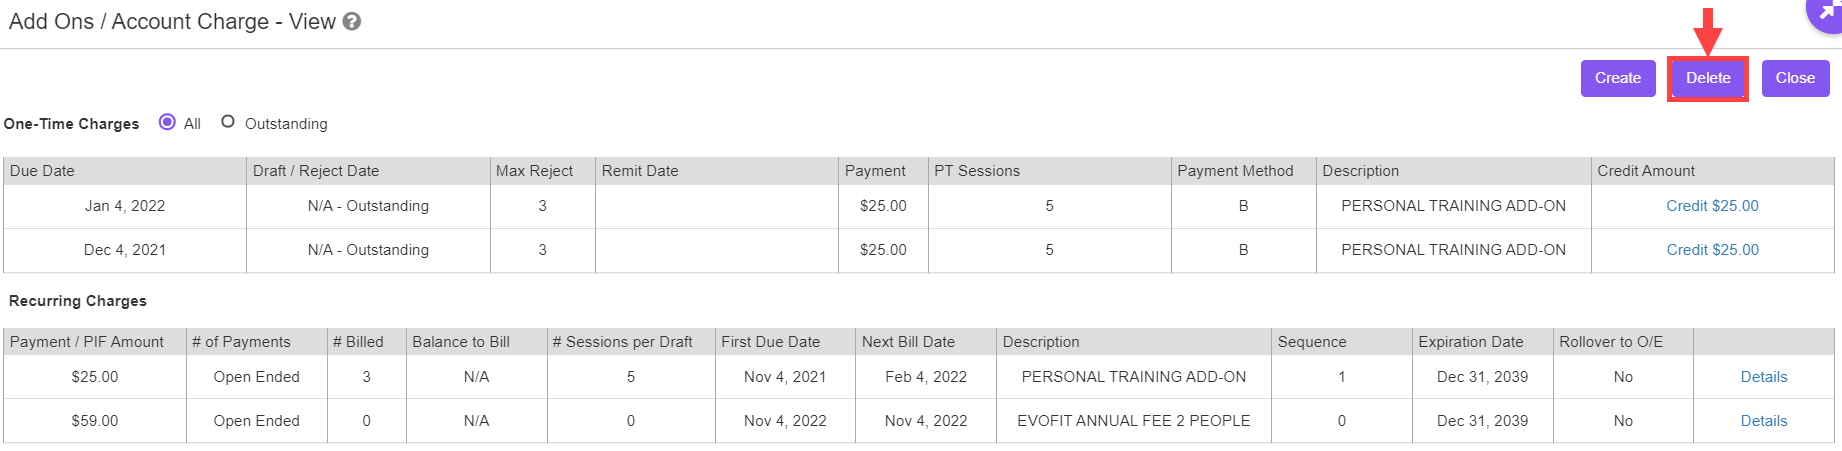
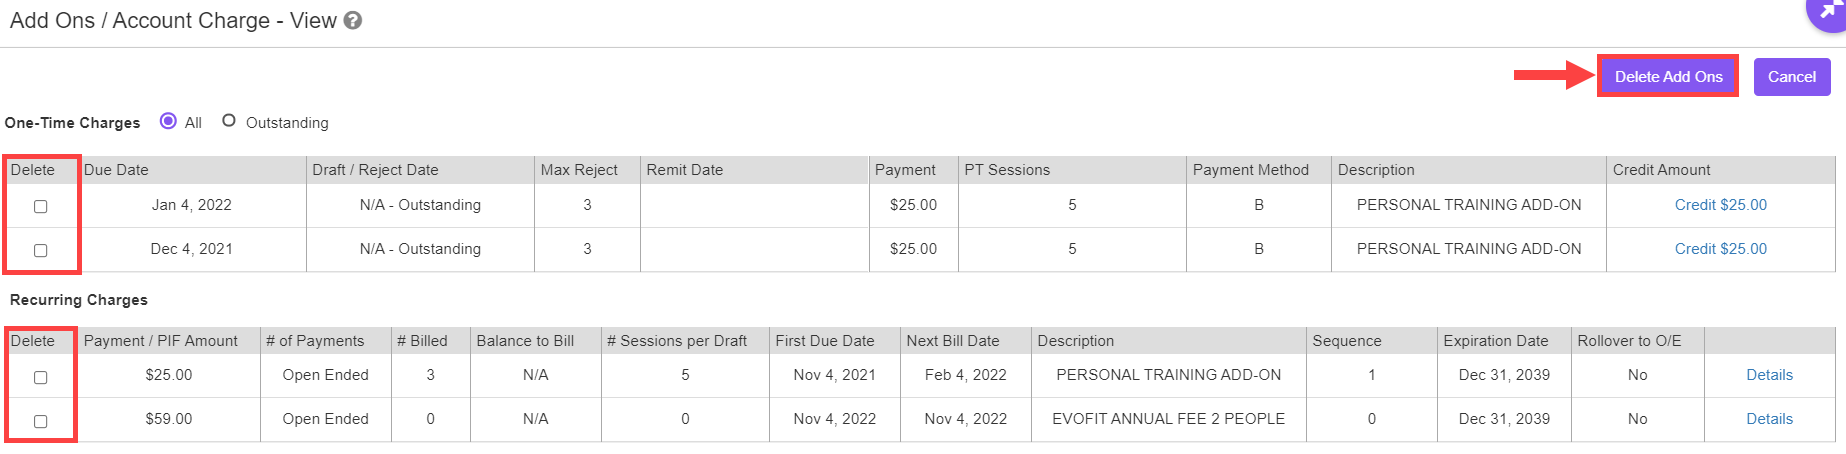
Selecting View lets you see all due and past-due charges, plus all current add-ons.
- The top section displays all due and past-due charges, both one-time and recurring. Here you find charges along with their Due Date, the Payment amount, a Description, and more.
- The bottom section shows all current recurring charges along with useful information for each: Payment Amount, Number of Payments made to date, Next Bill Date, and more.
Add a new charge or add-on #
To add a new add-on, the user must have the Add-On Entry/Delete/Credit permission set to at least Entry Only.
To add a new add-on or account charge:
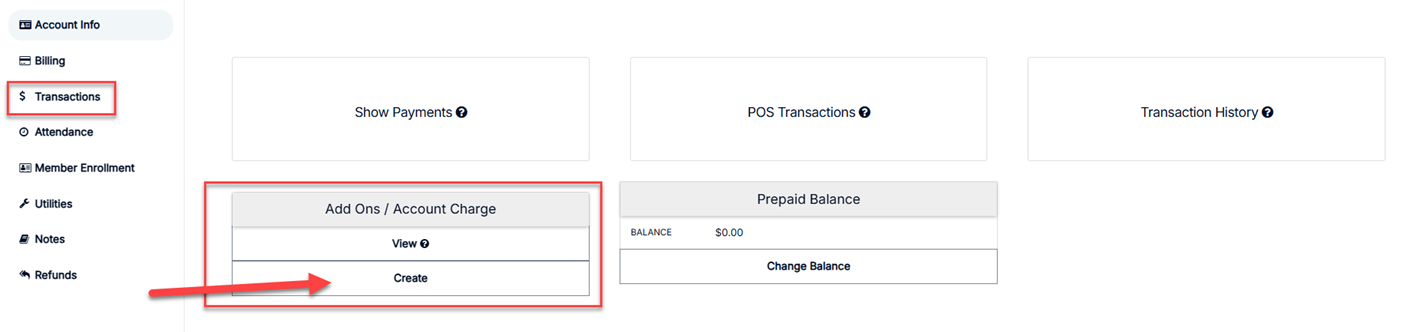
- Select Create from either the Transactions section of Member Management or from the View of the Add-ons/Account Charge section.
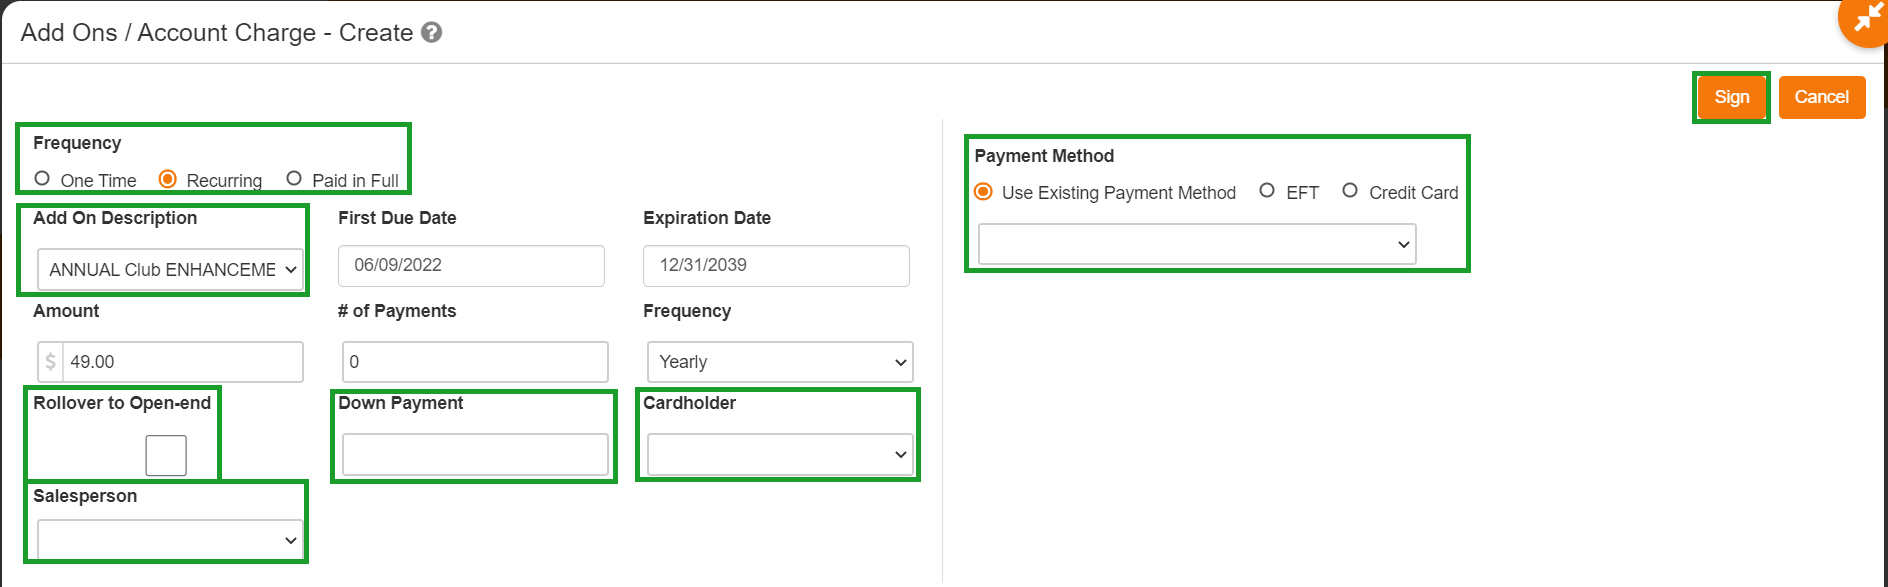
- Choose the add-on or charge frequency.
- Select the add-on from the Add On Description drop-down. This fills in some of the fields; make any needed edits to the pre-populated fields.
- If the add-on is recurring AND needs to roll over to open end once it expires, check the Rollover to Open-end option.
- If the member paid a down payment, record the amount in the Down Payment field.
- Select the proper Cardholder and Salesperson using the respective fields.
- Enter the payment information: select an existing payment method or choose EFT or Credit Card to add new payment information.
- Click Sign.
Edit an existing add-on #
- Select View from the Add-ons/Account Charge section of Transactions in Member Management.
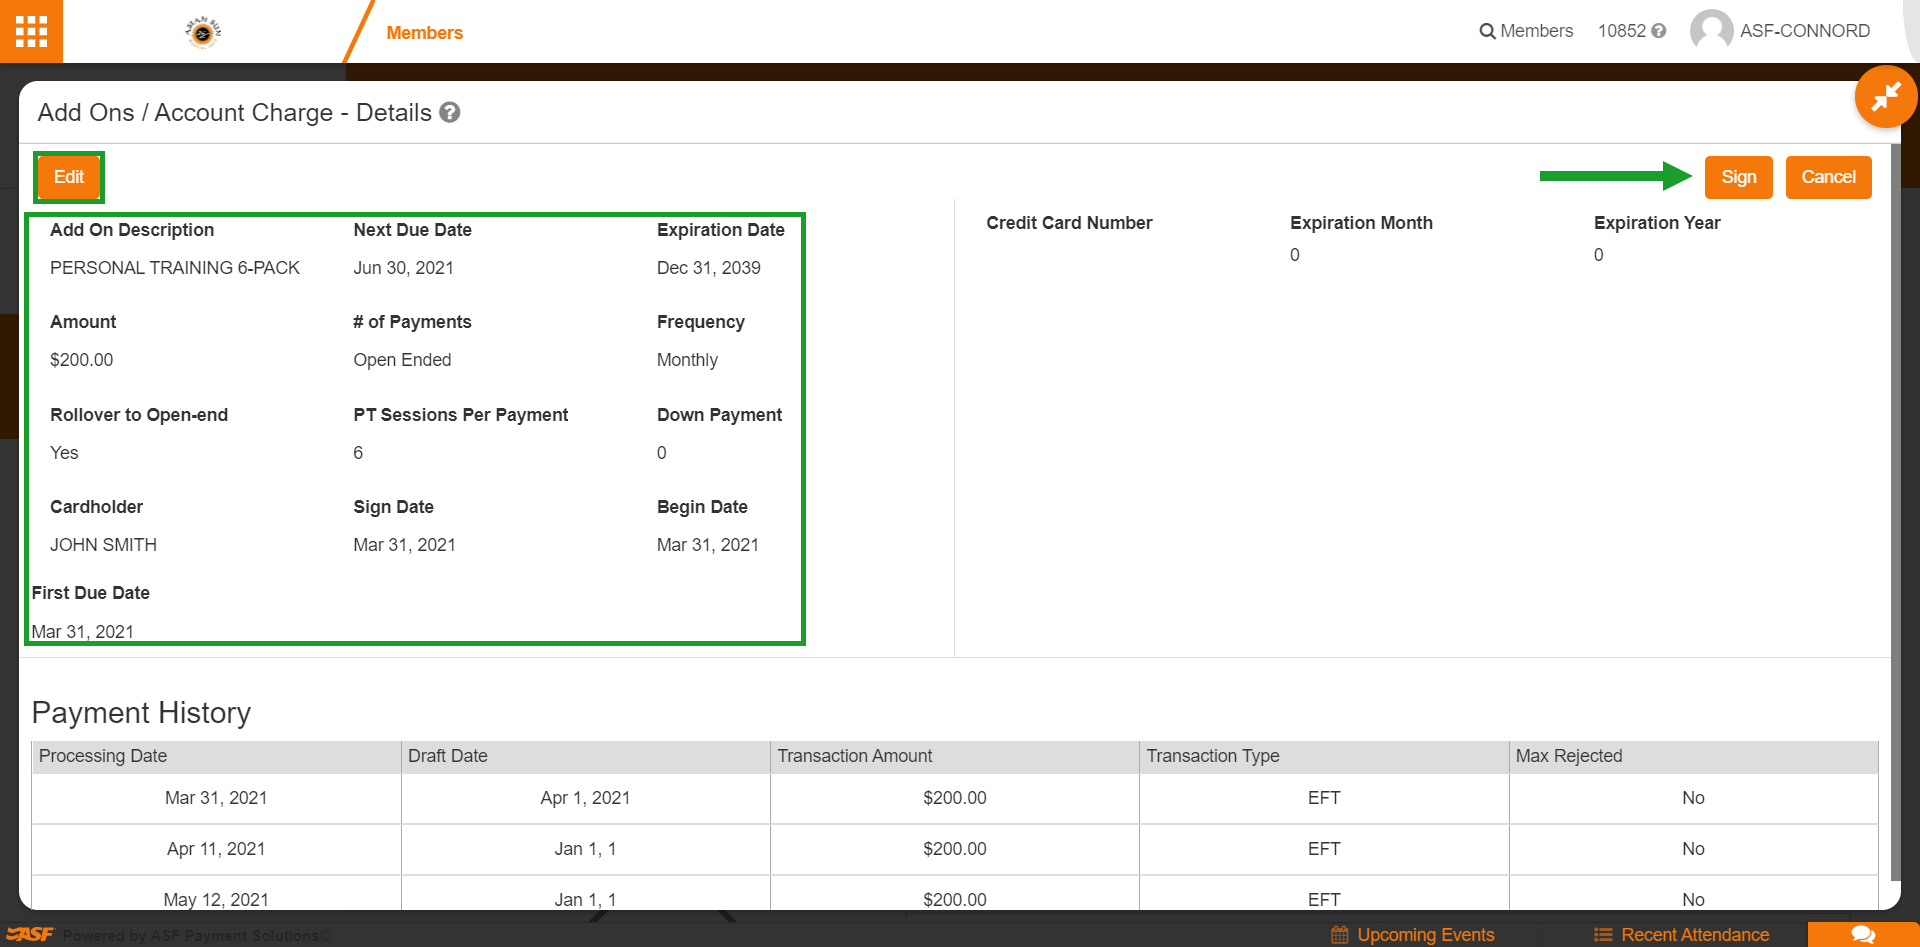
- Click Details next to the add-on you need to edit.
- Click Edit and make any changes to the editable fields.
- Click Sign.
Remove an add-on #
Best practice: deleting an add-on should only be done when an add-on has been added to a member's account in error. If a member meets the terms and conditions to be released from their add-on (relocation, permanent disability, death, or at the club's discretion), use the cancellation process instead.
To remove an add-on, the user must have the Add-On Entry/Delete/Credit permission set to All.
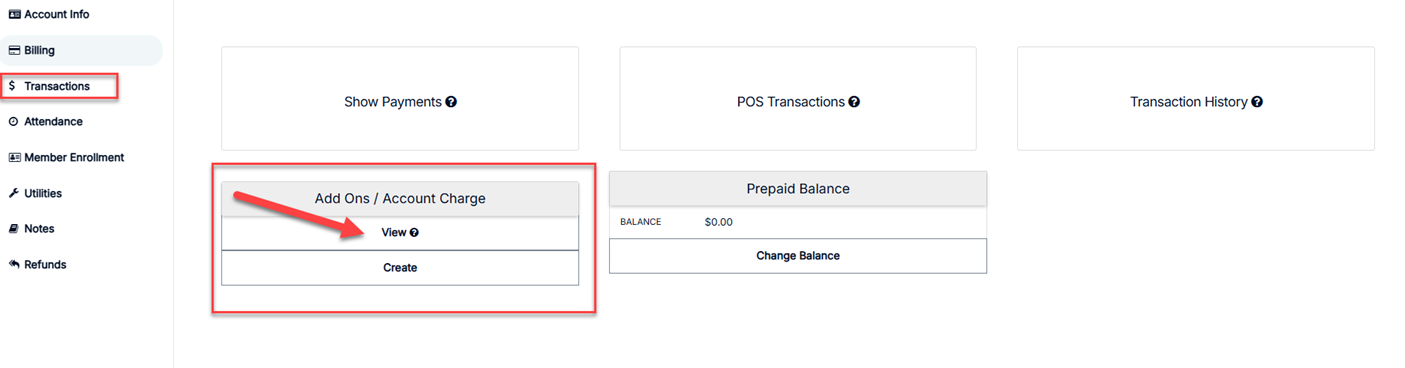
- Select View from the Add-ons/Account Charge section of Transactions in Member Management.
- Select Delete to enter delete mode, then select each add-on or account charge to be deleted. Once the add-ons have been selected, click Delete Add-ons.
Cancel an add-on (today or future-dated) #
Best practice: cancelling an add-on should be done when the member meets the terms and conditions to be released from their fiscal responsibility for the add-on, such as relocation, permanent disability, death, or when the club chooses to release the member. Unlike deleting, cancelling preserves a record of the add-on and the reason it was cancelled.
Member add-ons can be cancelled effective today or set to cancel at a future date. In either case, you will be prompted to select a Cancellation Reason. Notes will automatically be generated on the member's account when an add-on is cancelled or un-cancelled.
As with removing an add-on, this feature is only available to users with the Add-On Entry/Delete/Credit permission set to All.
Best practice: for consistent reporting and trend tracking, set up a predefined drop-down list of cancellation reasons rather than relying on free-text entries. Review the Client Preferences article to learn how to set up the predefined list.
To set a cancellation date for an add-on:
- Select View under the Add-Ons/Account Charge window from the Transactions section of Member Management.
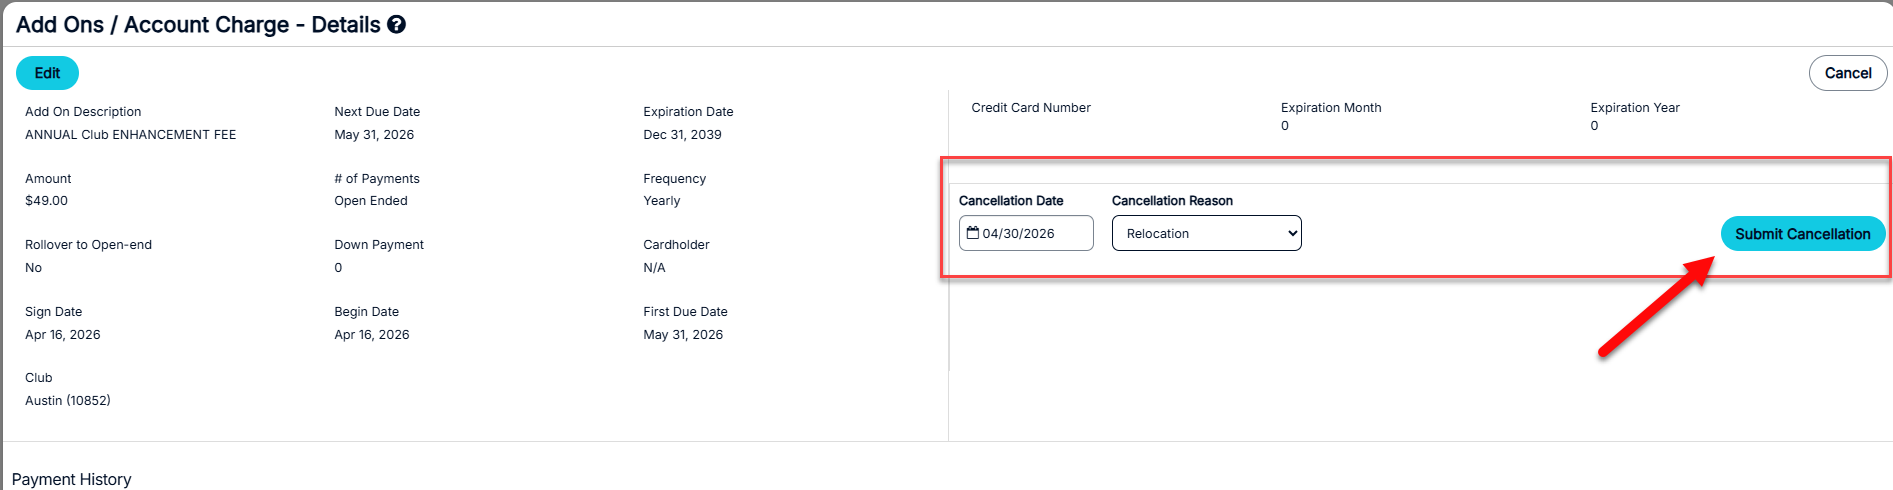
- Select Details for the recurring add-on you wish to cancel.
- Select the date the add-on should be cancelled from the Cancellation Date field. Note: if the Cancellation Date is set to the current date, the add-on will NOT be cancelled immediately. Instead, the add-on remains active until the end of the day, at which point it will be cancelled.
- Select a Cancellation Reason from the drop-down. If your club has not configured a predefined list, you may type a reason directly into the field.
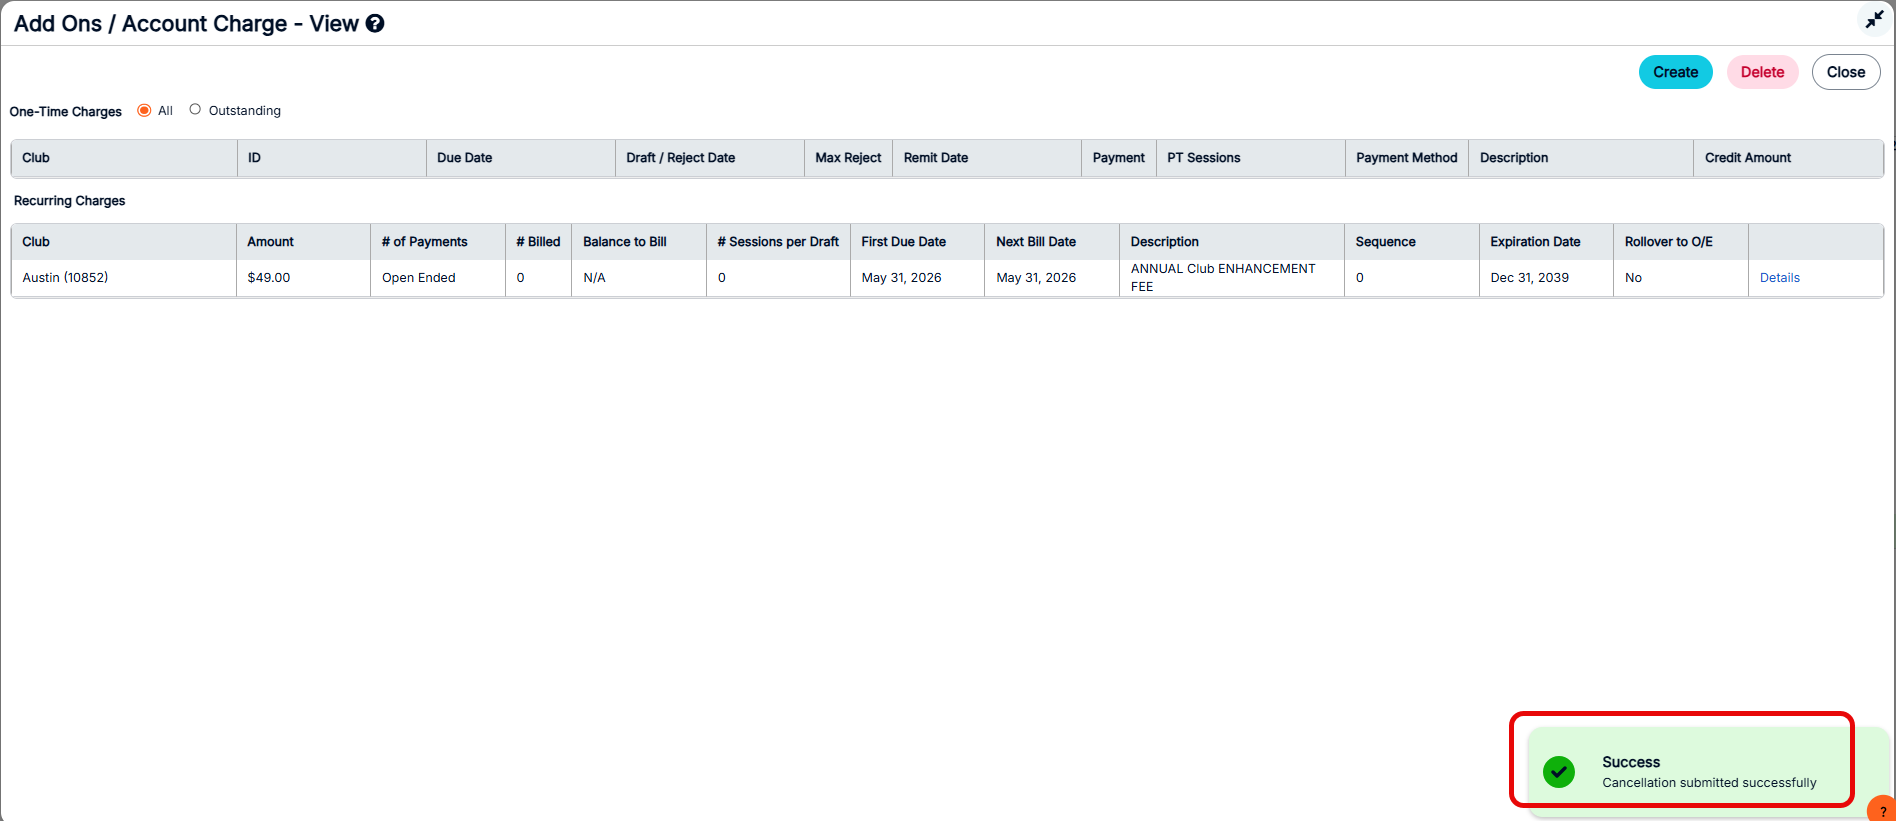
- Select Submit Cancellation when you are ready. Once the cancellation date is reached, the add-on will be removed from the member's account.

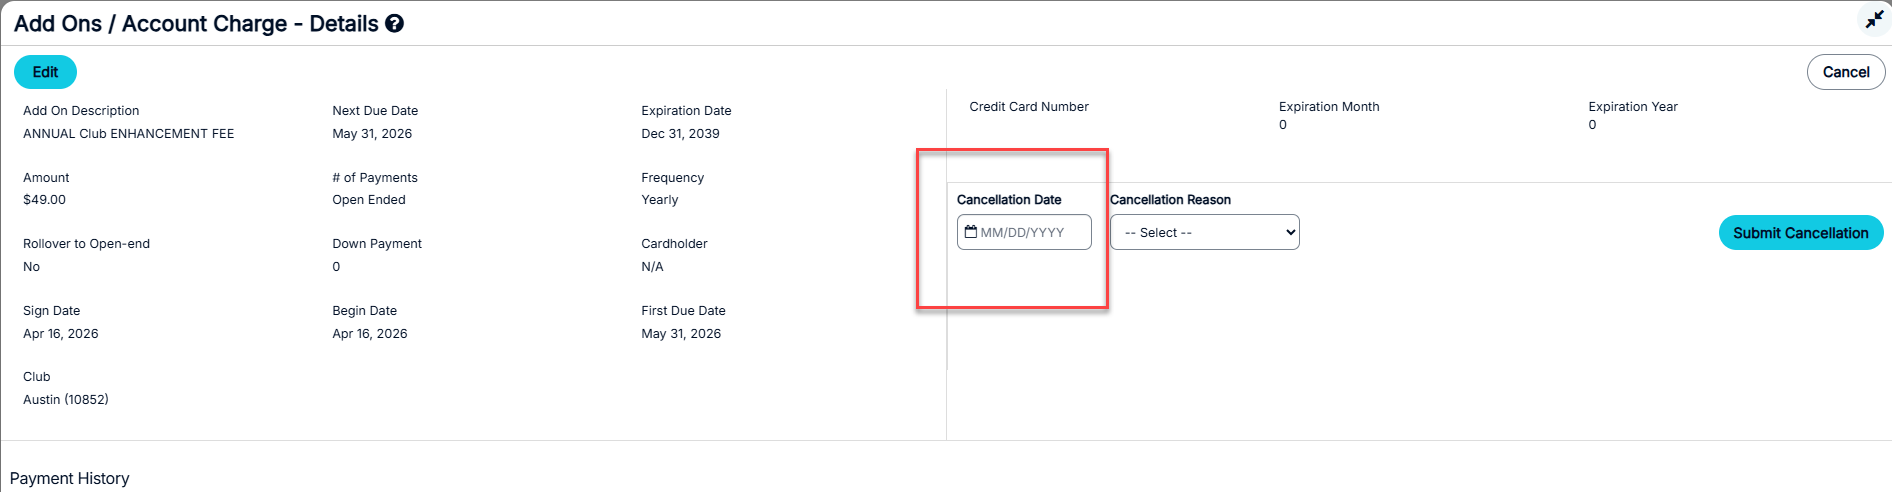
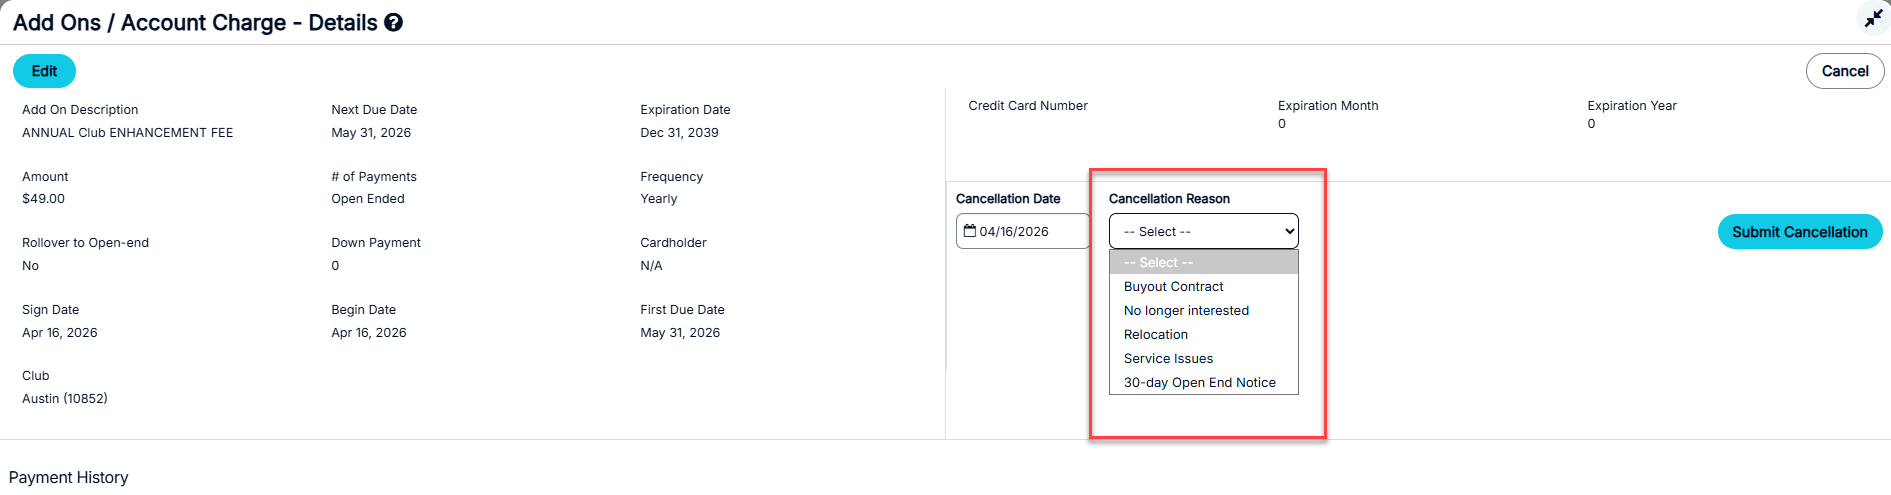
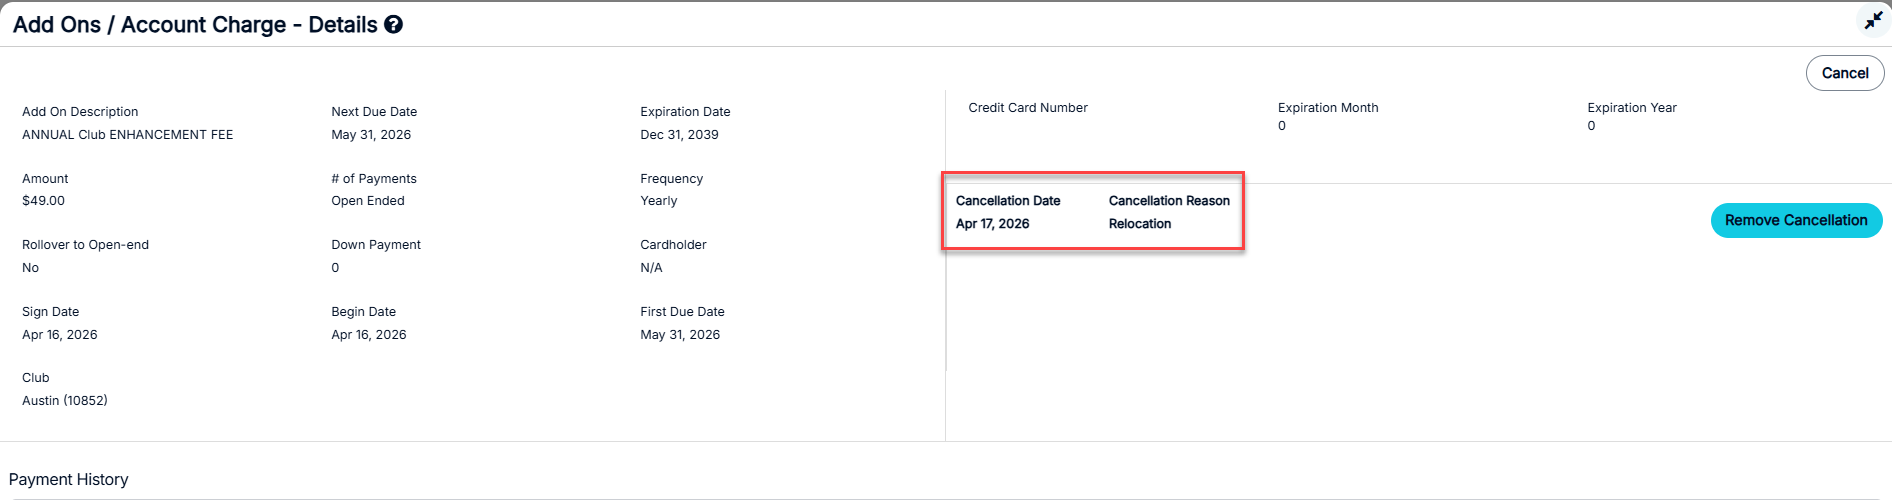
Note: the add-on remains listed as Active until the cancellation date. The pending cancellation appears on the same screen when viewing the specific recurring add-on.
Remove a pending cancellation #
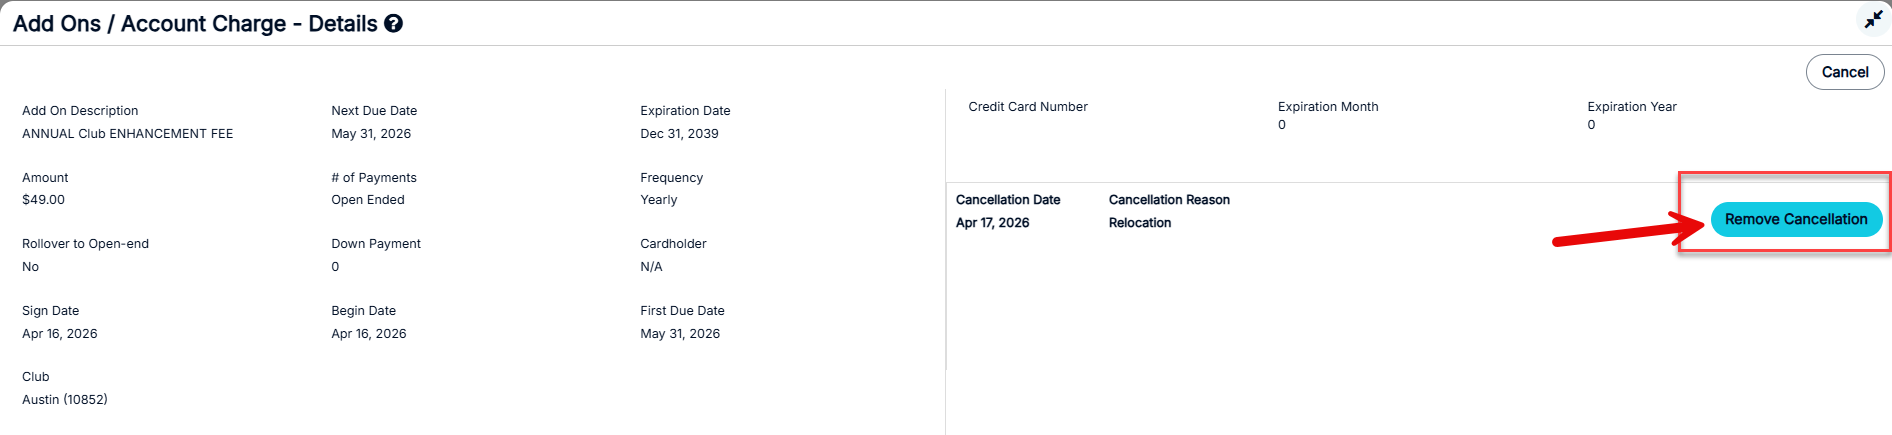
If a cancellation needs to be reversed before the cancellation date is reached, you can remove it by returning to the add-on's Details screen and clicking Remove Cancellation. Both the Cancellation Date and Cancellation Reason are displayed for reference before removing.
Association of revenue to clubs #
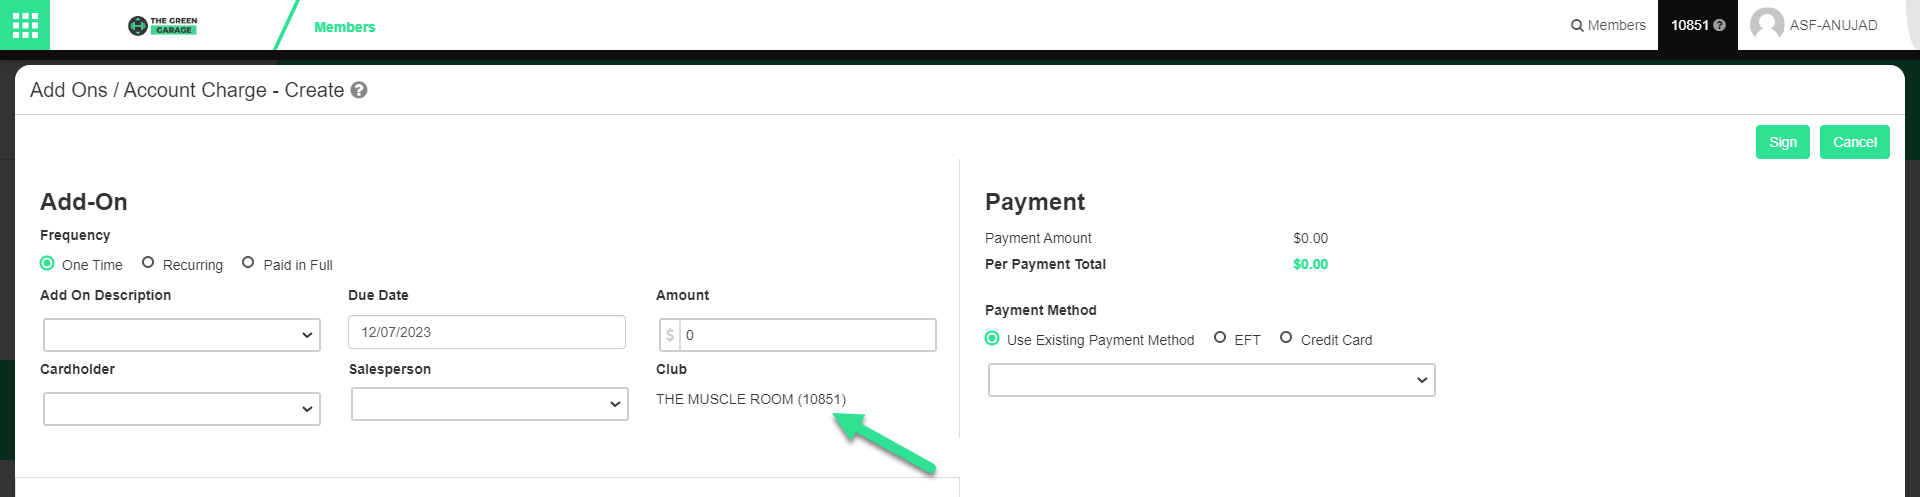
By default, add-on revenue is always associated with the member's home club, regardless of where the member signed up. There is an option to instead associate add-on revenue with the club where the member signed up. This changes where revenue is reported and where revenue is remitted.
This option must be enabled by your ASF account manager. Contact clientsupport@asfpaymentsolutions.com to discuss and enable. Once enabled, when an add-on is added to a member's account, the page displays the Club field that shows the club the add-on will be associated with (this is the club you are currently logged into or have switched into).
User permissions for add-on management #
There are three permissions that control user access to add-ons.
Add-Ons Access
- View Only: users may not add, edit, remove, or credit add-ons.
- Add Only: users may add add-ons; users may not edit, delete, credit, or cancel add-ons.
- Full Access: users may add, edit, delete, credit, and cancel add-ons.
| Level | View | Add | Edit | Delete | Credit | Cancel |
|---|---|---|---|---|---|---|
| View Only | Yes | No | No | No | No | No |
| Add Only | Yes | Yes | No | No | No | No |
| Full Access | Yes | Yes | Yes | Yes | Yes | Yes |
Add-Ons Access: Limited
- Available only when Add-Ons Access is Add Only.
- If checked, when adding or editing add-ons, a limited number of fields are enabled, and Due Date may not exceed 14 days from the current date.
- Fields enabled: Description, Due Date, First Due Date, Cardholder, Salesperson, Payment Method, Email Confirmation To.
- Fields disabled: Expiration Date, Amount, Number of Payments, Frequency, Rollover to Open-End, PT Sessions Per Payment, Front-Loaded PT Sessions, Down Payment. These default from the add-on setup and cannot be edited.
Add-Ons Access: PT Only
- Available only when Add-Ons Access is Add Only.
- If checked, add-on creation is restricted to session-based PT add-ons.
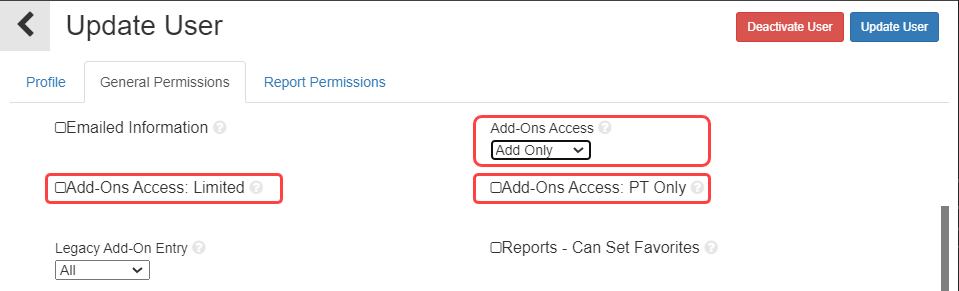
Note: User permissions for legacy add-on entry have been moved to a separate, dedicated permission, "Legacy Add-On Entry".
Refunds on add-on payments #
Refunds on add-on payments can be issued through Member Management. For the refund workflow, see the Refunds section of Navigating member accounts.
Need help? #
Contact your ASF account manager at clientsupport@asfpaymentsolutions.com.